Using Bitcoin Core with Sparrow Wallet
Increase your privacy, security and have more direct control over your Bitcoin by using your own private bitcoin node with Sparrow Wallet.
In this guide, you will learn how to launch and use your own Full Bitcoin Node in AWS and connect to it with Sparrow Wallet quickly and easily.
Introduction to Sparrow Wallet
Sparrow Wallet is a modern desktop Bitcoin wallet that is designed for security, privacy, and usability. It is a free and open-source project that is actively developed by a community of contributors. Sparrow Wallet supports a wide range of features, including:
- Hardware wallet support
- Coin control
- Transaction fees customization
- Privacy features such as PayNym and Tor
- Built-in block explorer
- Transaction editor
- Comprehensive help guide
Introduction to Syntactic Engineering Full Bitcoin Node
Syntactic Engineering’s Full Bitcoin Node is a production grade, cli-only, fully synchronized Bitcoin node provided through the AWS Marketplace. It is released weekly, ensuring the blockchain will always be up to date.
Getting Started
To begin, install Sparrow Wallet on your system, and launch the Full Bitcoin Node into your AWS account.
Watch Your Cloud Spend
AWS charges for the disk, bandwidth, and EC2 instance. Syntactic Engineering charges for running the pre-synchronized Full Bitcoin Node. Syntactic Engineering has a free trial, and both will charge hourly for resources used. To keep costs low, be sure to stop or terminate the instance when it is not in use.
Gather Information
Once you have Sparrow installed and a Full Bitcoin Node running, you will need to gather some information before connecting Sparrow with bitcoind.
Sparrow User
Once the Bitcoin Node is running, follow the instructions to connect to the instance using SSH or SSM.
After you’re connected, the first step is to create a sparrow user with a
secure, randomized password. To do this, run rpcauth.py sparrow. It will look
like the following:
$ rpcauth.py sparrow
String to be appended to bitcoin.conf:
rpcauth=sparrow:2817f65dd74adaa52f33f0f6588367e8$da77cd4c086077a3b2691ad3afdcb051e76db675b31da1dbcccd874f7ea3998f
Your password:
iYNtzTasYQrUGr3h4oa09mZ9XUjdJpcXB9JYgunKDGE=
This output contains two important things. The long line that begins with
“rpcauth=” will need to be added to /etc/bitcoin/bitcoin.conf. The last line
is the sparrow user’s password, which you will provide to Sparrow Wallet to
connect to your Bitcoin Node. Make a note of both.
Bitcoin Node IP Addresses
Your Bitcoin Node will have a local, private IP and a public IP. They are available in the AWS console, or from the command line when logged into the server.
Run the following command to retrieve your server’s local and public IPs:
$ curl http://169.254.169.254/latest/meta-data/public-ipv4
3.133.148.196

$ curl http://169.254.169.254/latest/meta-data/local-ipv4
10.0.11.6
In this case, my node’s local IP is 10.0.11.6 and its public IP is 3.133.148.196.
Your Desktop IP
Find your desktop’s public IP where Sparrow Wallet is installed by going to https://icanhazip.com/. Record it.
Update bitcoin.conf
It’s time to edit bitcoin.conf. Using your favorite editor, I’ll use nano in our example, open up /etc/bitcoin/bitcoin.conf:
sudo nano /etc/bitcoin/bitcoin.conf
Once bitcoin.conf is open, scroll down or search until you see the “rpcauth” section.
First, add the line that begins with “rpcauth” from above. This will effectively add the “sparrow” user to bitcoind.
rpcauth=sparrow:2817f65dd74adaa52f33f0f6588367e8$da77cd4c086077a3b2691ad3afdcb051e76db675b31da1dbcccd874f7ea3998f
Second, we need to configure the network permissions for bitcoind. By default, bitcoind only allows connections on its RPC port from localhost. Since we want to connect to it over the internet, we will need to allow your specific IP access.
Add the following lines to bitcoin.conf in the same section as your rpcauth line.
rpcallowip=127.0.0.1
rpcallowip=136.53.207.64  # Your Desktop Public IP
rpcbind=127.0.0.1
rpcbind=10.0.11.6  # Your Node's Local IP
Once those 5 lines have been added, save and exit (ctrl+x).
Restart bitcoind
Bitcoind needs to be restarted to pick up the changes to bitcoin.conf. Run the following to restart bitcoind.
sudo systemctl restart bitcoind
If there are any errors in bitcoin.conf, bitcoind may fail to start. To see if
it started successfully, run sudo systemctl status bitcoind. If it failed to
start, find the error by running sudo less /var/lib/bitcoin/debug.log.
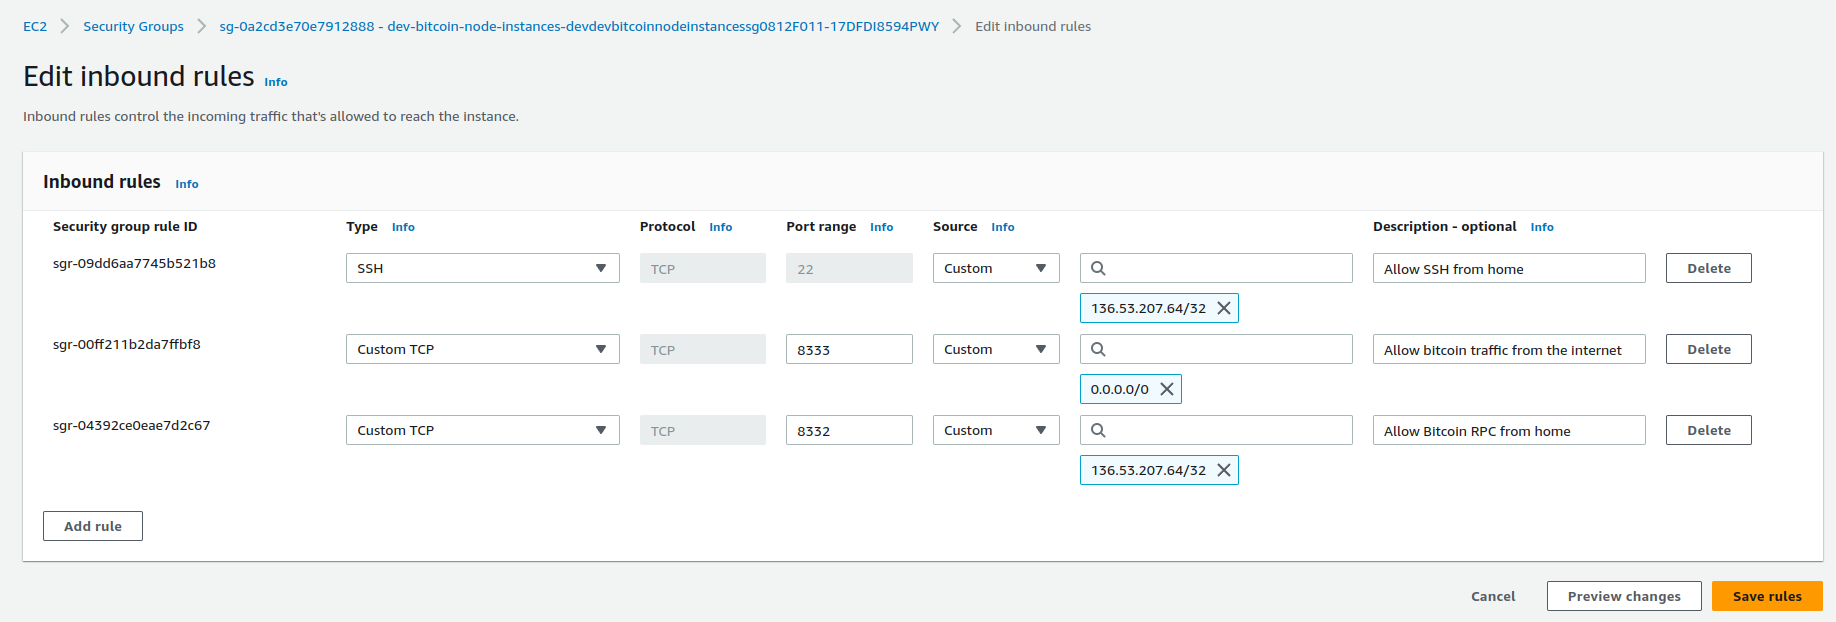
Update AWS Security Group
The final step in allowing Sparrow Wallet to use your own Bitcoin Node is to open the AWS Security Group to allow the connection to the Bitcoin Node from your Desktop IP over port 8332.
It should look something like this, where port 22 (SSH) and port 8332 are
allowing connections from your desktop’s public IP (136.53.207.64/32), and
port 8333 is open to the internet (0.0.0.0/0).
Be sure to add a “/32” to your IP to indicate that it is a single IP (AWS requires this).
Configure Sparrow Wallet
Finally we can configure Sparrow to connect to our private Bitcoin Node.
In Sparrow -> Preferences -> Server, select Server Type “Bitcoin Core”. Give it
your Bitcoin Node’s Public IP, port 8332, user sparrow and password from
above. Click “Test Connection”
If everything was configured correctly, Sparrow will look like the following.

Troubleshooting
If Sparrow can’t connect to your Bitcoin Node, double check the following items:
Ensure bitcoind is running (sudo systemctl status bitcoind shows “active(running)”).
Check bitcoind’s debug log with sudo less /var/lib/bitcoin/debug.log.
Ensure /etc/bitcoin/bitcoin.conf contains a block like the following. Be sure it’s not at the bottom of the file (in which case it may not apply to [main]).
rpcauth=sparrow:2817f65dd74adaa52f33f0f6588367e8$da77cd4c086077a3b2691ad3afdcb051e76db675b31da1dbcccd874f7ea3998f
rpcallowip=127.0.0.1
rpcallowip=136.53.207.64  # Your Desktop Public IP
rpcbind=127.0.0.1
rpcbind=10.0.11.6  # Your Node's Local IP
Ensure the EC2 security group is modified to allow connections from your Desktop’s Public IP on port 8332.
Ensure you provided Sparrow Wallet with the password provided from
rpcauth.py, where it said “Your password:”.
If you’re still having trouble, or you would like additional help running your own Bitcoin Nodes, reach out to us at [email protected].